Gorgeous! It is probably the first word that comes gushing out of your mouth when you see an Indian bride. Indian bridal hairstyles look great, but they are too many to choose from and complicated to achieve as well.
Every bride-to-be starts planning their look for D-day at least a few weeks or months ahead. But, too many options, particularly with regard to hairstyles, leave them spoilt for choice. Do I leave my hair loose? Or do I opt for an updo? How will it look in the wedding album? These are just a few of the many questions that start running through your mind as the wedding day draws near. Don’t worry! We are here to help you choose the best one for your special day and make everyone go gaga over it. In this article, we have come up with a list of the 40 best hairstyles for Indian brides, a step-by-step guide on how to do them, and much more. So, let’s get started!
Side Parted Ringlet Bun
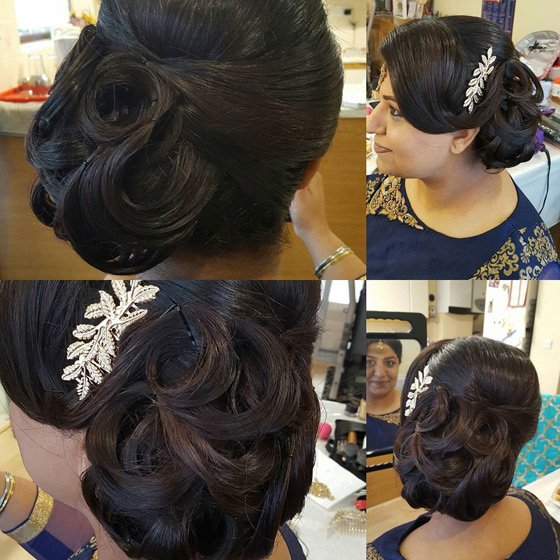
Come wedding season, every inch of it – from the decor to the bride’s dress – is covered in floral motifs. It’s a pity that leaf-themed designs are so underrated. This elegant ringlet bun has been accessorized with a gold comb in a beautiful leaf design to create a look inspired by nature.
What You Need
- Hairbrush
- Heat protectant
- Straightening iron
- 3/4th inch curling iron
- Hair elastic
- Texturizing spray
- Bobby pins
- Fancy hair comb
- Strong hold hairspray
How To Style
- Brush out all the knots and tangles from your washed and dried hair.
- Prep your hair with some heat protectant.
- Straighten the front section of your hair and section it off.
- Tie all the hair at the back into a mid-level ponytail.
- Picking up 1-inch sections of hair at a time, curl all the hair in your ponytail.
- Spritz on some texturizing spray all over your curls.
- Pick one curl from your ponytail, roll it into a ringlet, and pin it to your head, near the base of your ponytail.
- Keep repeating the previous step until all the hair in your ponytail has been rolled and pinned up.
- Part the front section of hair (that you had left out earlier) on one side.
- Pick up the hair from one side of your parting, swoop it back, and pin it right above the bun.
- Repeat the previous step with the hair on the other side of the parting.
- Insert your fancy hair comb into one side of your bun.
- Spritz on lots of hairsprays to set the ringlet bun in place.
Elegant Twisted Side Bun

Not everyone wants to go for the traditional red lehenga for their wedding. If you would like to go for some classy neutral tones, here’s an updo that will go wonderfully with it. This elegant twisted updo keeps things simple and chic and directs all the attention to your designer dress.
What You Need
- Heat protectant
- Straightening iron
- Hair elastic
- Bobby pins
- Strong hold hairspray
How To Style
- Prep your washed, dried hair with some heat protectant.
- Picking up 2-inch sections of hair at a time, straighten all your hair.
- Leaving out the front sections of your hair, tie all the hair at the back into a low-side ponytail.
- Pick up a 2-inch section of hair from your ponytail, roll it loosely into a bun, and pin it to your head.
- Pick another 2-inch section of hair, loosely roll and wrap it around the first section, and pin it in place.
- Keep repeating the previous step until all the hair in your ponytail has been rolled into a low-side bun.
- Part the sectioned-off hair in the front on one side.
- From the side of the parting with more hair, pick up a 2-inch section from right next to the parting.
- Split this section into 2 parts and start French twisting them by adding more hair to it with each subsequent twist.
- Once you run out of hair to add to your French twist, simply twist it a couple of times, place it across the top of your bun, and pin it on the other side.
- Repeat steps 9 and 10 on the other side.
- Spritz on some strong-hold hairspray to set the do in place and finish off the look.
Curly Tendrils Updo
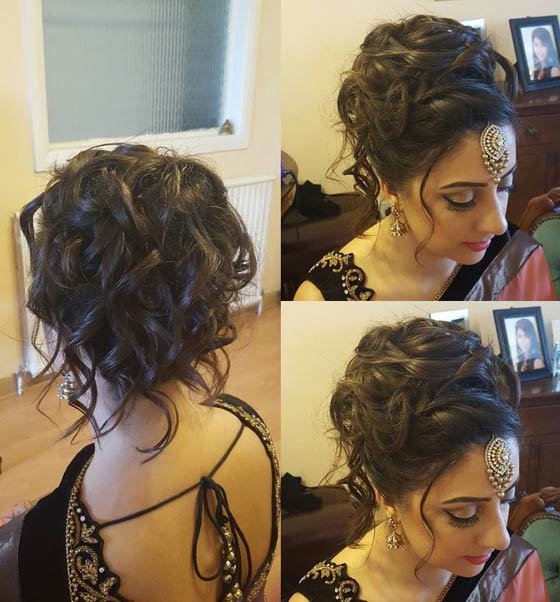
So you want to go full dramatic on your wedding day, huh? Well, then there is no hairstyle that will suit you better than this beautiful updo. This stunning hairstyle makes your curls flow down in beautiful tendrils down your neck and accentuates your earrings.
What You Need
- Heat protectant
- 1 inch curling iron
- Hair donut
- U pins
- Bobby pins
- Strong hold hairspray
How To Style
- Start off by applying some heat protectant to your hair.
- Picking up 1 inch sections of hair at a time, curl all your hair.
- Tie your hair into a high ponytail.
- Insert your hair donut at the base of your ponytail.
- Carefully roll, place, and pin sections of your ponytail onto the hair donut to hide it from view.
- Make sure the ends of your curls hang loose to create the tendril effect.
- Pull out some strands of hair from the front to frame your face.
- Spritz on some hairspray all over your updo to finish off the look.
Dramatic Center Parted Bun
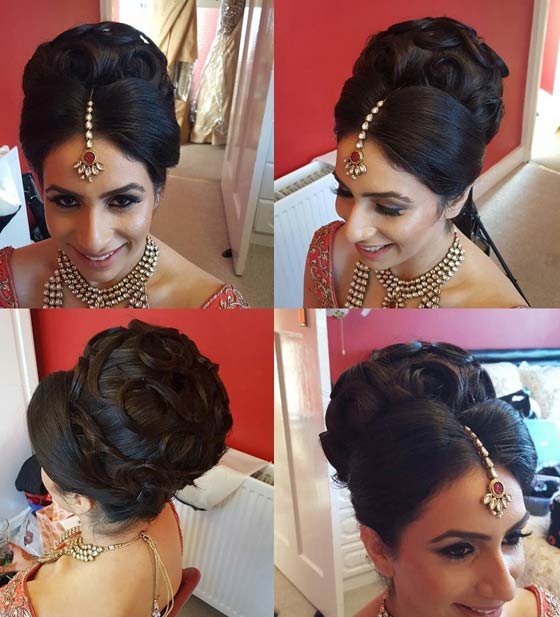
Every bride wants to look like a princess on her wedding day. Her dress, hair, and makeup are styled to make that dream come true. This opulent donut bun adds a graceful twist to the basic donut bun.
What You Need
- Texturizing spray
- Hair elastic
- Hair donut (big)
- U pins
- Bobby pins
- Fine-toothed comb
- Smoothening serum
- Strong hold hairspray
How To Style
- Prep your hair with some texturizing spray to give it some hold.
- Part your hair down the middle.
- Tie your hair into a super high ponytail.
- Insert your hair donut onto the base of your ponytail.
- Leaving out a section of hair from your ponytail in the middle, start rolling the hair donut up the length of your ponytail while simultaneously wrapping your hair around it.
- Once your hair donut has reached the base of your ponytail, pin it in place with the help of U pins.
- Now, divide the left-out section of hair into thinner sections.
- Pick up individual sections of hair, roll them in ringlets, and pin them onto the bun.
- Insert the tail of your fine-toothed comb under the center-parted hair at the front and pull it up to create some volume.
- Spread smoothening serum all over your comb and run it through the hair at the front to get rid of any frizz.
- Finish off with some spritzes of hairspray to set the updo in place.
Loose Romantic Braid
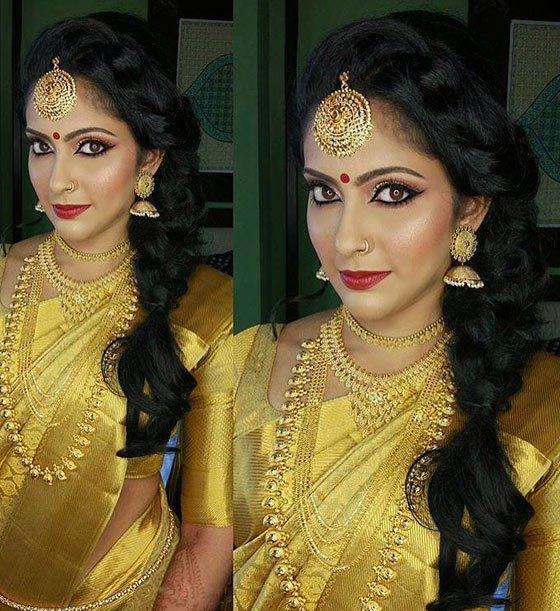
Girl, if the thought of curling irons and hairsprays makes you want to run away, I’ve got your back. Not only is this simple twisted braid style oh-so-beautiful, but it also pairs gorgeously with heavy silk sarees to create the perfect South Indian bride.
What You Need
- Texturizing spray
- Hair elastic
- Maang teeka
How To Style
- Spritz on some texturizing spray all over your hair.
- Part your hair on one side.
- Flip all your hair onto one side, over your shoulder.
- From the side of your parting with more hair, pick up a big chunk of hair from near the top and split into two sections.
- French twist these sections by intertwining them with each other and adding more hair from the side of the forehead into the twisted braid.
- Once your French twist reaches the nape of your neck, just split all your hair into 3 sections and braid it right till the end.
- Secure the end with a hair elastic.
- Loosen your braid to make it look softer and more romantic.
- Put on your maang teeka to finish off the look.
Bouquet Bun
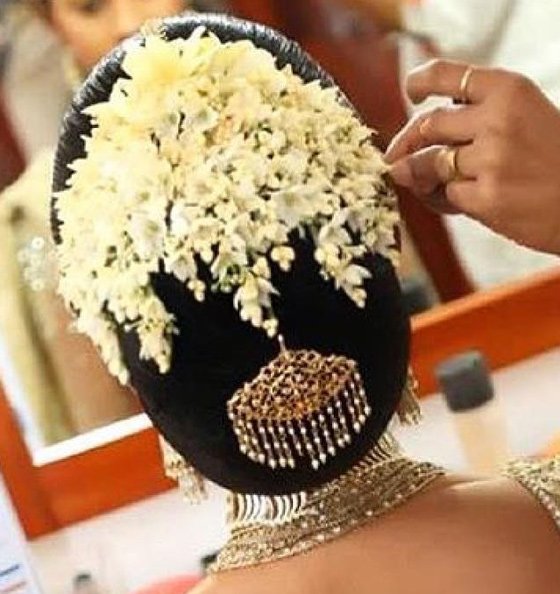
Gajra (jasmine hair garland) is an intrinsic part of all Indian weddings. Nobody’s outfit at a wedding is complete without a string of jasmine adorning the hair. This bouquet bun is a modern take on the traditional gajra and uses the flowers in the form of a small bouquet to accessorize the simple low bun.
What You Need
- Fine-toothed comb
- Smoothening serum
- Hair elastics
- Bobby pins
- Juda net
- Fresh flowers
How To Style
- Brush out all the knots and tangles from your hair.
- Apply some smoothening serum all over your hair to sleek it down and remove any frizz.
- Use a fine-toothed comb to backcomb all your hair.
- Tie your hair in a low ponytail at the nape of your neck.
- Twist and roll your ponytail into a bun and secure it to your head with the help of bobby pins.
- Put the Juda net around the bun.
- Arrange your fresh flowers into a small bouquet and pin it on top of your bun.
- You can add more accessories if you like.
- Spritz on some hairspray all over your bun to finish off the look.
Intricate Floral Updo
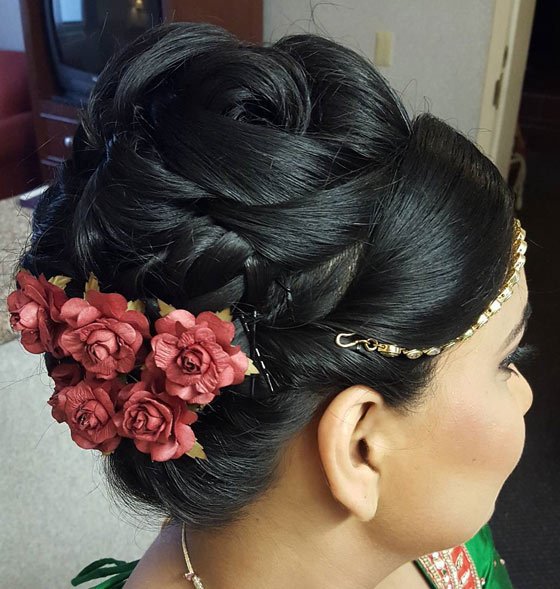
If you are allergic to flowers – or simply don’t like them – here’s an alternative that you can try out. This intricate high updo has been adorned with artificial flowers to add a celebratory feel to the whole look. The plus point of using faux flowers is that you can get them in colors that match your outfit exactly.
What You Need
- Texturizing spray
- Hair elastic
- Bumpit (small)
- Hair donut
- Bobby pins
- U pins
- Artificial flowers
- Strong hold hairspray
How To Style
- Prep your washed, dried hair with some texturizing spray.
- Section off the front section of your hair.
- Insert a bumpit under the hair at the crown of your head.
- Tie a mid-level ponytail with all the hair at the back.
- Insert a hair donut at the base of your ponytail.
- Pick up big chunks of hair from your ponytail and loosely roll and pin them onto your hair donut to hide it from view.
- Part the front section of hair on one side.
- Take all the hair from the side of the parting with more hair, twist it right till the end, and pin it back near your bun with a couple of bobby pins crisscrossed over each other.
- Repeat the previous step on the other side.
- Add some artificial flowers to your updo with the help of some U pins.
- Finish off with a few spritzes of hairspray to secure the do in place.
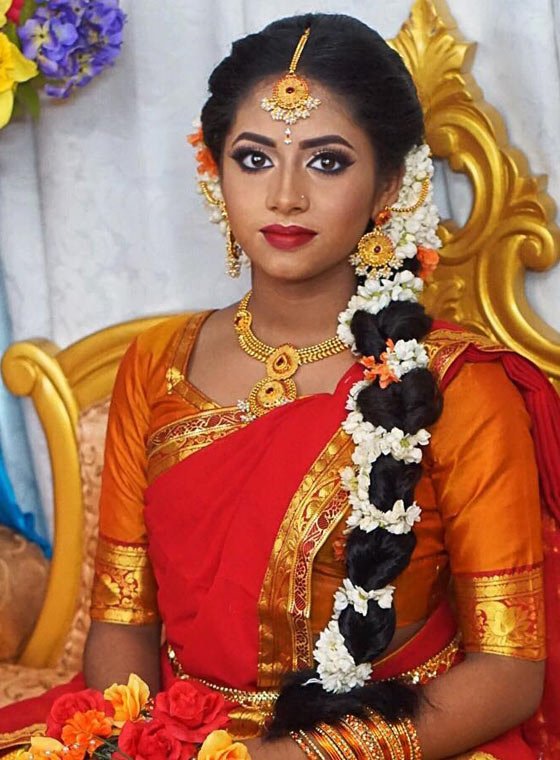
Elaborate Poola Jada Braid

No South Indian bridal outfit is complete without a traditional poola jada. A poola jada is basically a two-piece floral accessory that goes like a crown around the base of the braid and all along the length of the braid. Once adorned, the bride looks nothing less than a queen.
What You Need
- Smoothening serum
- Fine-toothed comb
- Bobby pins
- U pins
- Hair elastics
- Savaram (hair extensions)
- Poola Jada (floral hair accessory)
- Jadagantalu (hanging braid accessory)
How To Style
- Start off by applying smoothening serum to your hair to get rid of any frizz.
- Back comb your hair with a fine-toothed comb.
- Split your hair into 3 sections and start braiding your hair.
- When you have braided till about halfway down, add your savaram to it and split it evenly between the 3 sections of your hair.
- Continue braiding.
- Add your jadagantalu when you have braided about 3/4th of the way down.
- Continue braiding right till the end and secure with a hair elastic.
- Affix your poola Jada to the base and length of your braid with the help of bobby pins and U pins to finish off the look.
Pull Through Gajra Braid
Why go for a simple braid when there are so many new and gorgeous styles to try out? This pull through braid imitates the look of the regular braid but it has a more beautiful full-bodied dimension to it. Adorn it with a gajra to perfect this pretty look.
What You Need
- Smoothening serum
- Fine-toothed comb
- Bobby pins
- Hair elastics
- Gajra
How To Style
- Apply smoothening serum all over your washed, dried hair to get rid of all the frizz.
- Sleek down your hair with the help of your fine-toothed comb.
- Part your hair down the middle.
- Pick up a big chunk of hair from near the left side of your parting, twist it a couple of times, and pin it at the back of your head.
- Repeat the previous step on the other side.
- Gather all your hair and tie it into a low ponytail.
- Tie a rubber band about 3 inches below the base of your ponytail.
- In the hair that is between the two hair elastics, create a gap in the middle with the help of your fingers.
- Pick up the tail of your ponytail and flip it up and into this gap to topsy tail it.
- Tug and loosen the flipped hair to give it a fuller look.
- Tie another hair elastic 3 inches below the previous one and repeat this process.
- Repeat steps 7 to 11 until all you reach the end of your hair.
- Twine a gajra around your braid and secure it with the help of bobby pins to finish off the look.
Gold Floral Bun
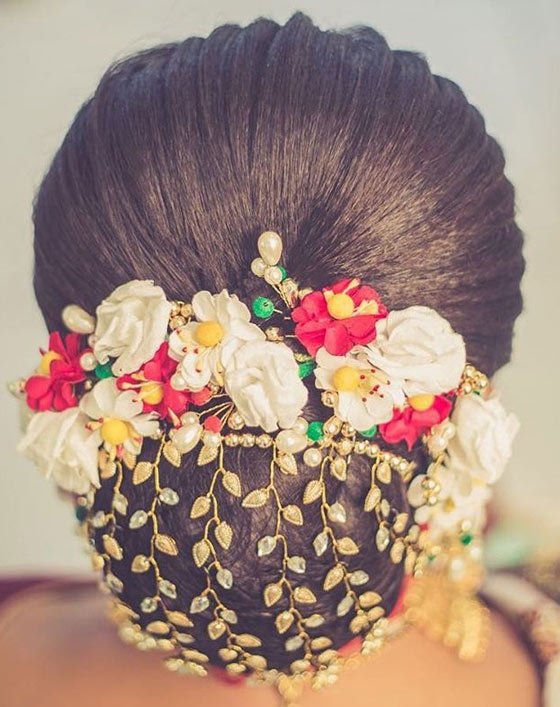
Flowers possess the unique quality of infusing a breath of freshness to any look that they are incorporated in. This simple traditional bun has been decked up with a fancy juda net and some gorgeous flowers.
What You Need
- Smoothening serum
- Fine-toothed comb
- Hair elastic
- Bobby pins
- Fancy golden juda net
- Artificial flowers
- U pins
- Strong hold hairspray
How To Style
- Apply smoothening serum all over your washed, dried hair.
- Sleek back all your hair with a fine-toothed comb.
- Tie your hair into a low ponytail a little above the nape of your neck.
- Twist and roll your ponytail into a bun and secure it to your head with some bobby pins.
- Insert your Juda net around your bun.
- Use U pins to attach artificial flowers around the top circumference of your bun.
- Spritz on some strong-hold hairspray to finish off the look.