
To trace the following designs you can use 1 of the 2 methods
1st Method – Sooper Easy, just use yellow carbon or white carbon like we use blue or black carbon with paper.
2nd Method – Little tedious, After you have the print out on the paper, trace the complete design on a plastic base tracing sheet and then make holes on each and every line of the design, either manually or using a electric pen, once the punching is complete, next prepare a mixture.
How to prepare mixture for embroidery – For the mixture you will need tracing powder and very little kerosene. Mix these together and make a paste not too thick nor too thin, next you will need some cotton or some waste fabric.
Now place the perforated design sheet on the fabric where you want the design to be transferred. Dip the waste cloth in the mixture and then rub it on the holes. Do this step at least 2 times so that the mixture passes through the holes neatly and the design is clearly visible. Don’t lift the tracing sheet until you finish this step, once you are sure you have rubbed it everywhere you can lift it. Immediately the design will not be visible so don’t panic, after 2 mins the kerosene will evaporate and white dots will be visible….. pheeeeew quite a long process.
Below are few images that can be easy downloaded and resized. If you have a printer at home you can print them yourself or just walk in to a cyber cafe and they will do it for you. Right click on the image and select save image as, save it on to your desktop or any desired folder and print.
Please note – Not all images fit A3 size.
Tracing Powder or Chalk Powder – BUY NOW
The above design can be used for elbow length sleeves. Design looks very grand once it is filled with zari, thread and other embroidery supplies.
Shop Embroidery Supplies HERE.
Tracing Powder or Chalk Powder – BUY NOW

This design can be used for a short sleeve. A part of this design can be used for the neckline as well. Kundans and beads can be used to fill this design or only silk thread and zari can also be used.
Shop Embroidery Supplies HERE.
Tracing Powder or Chalk Powder – BUY NOW

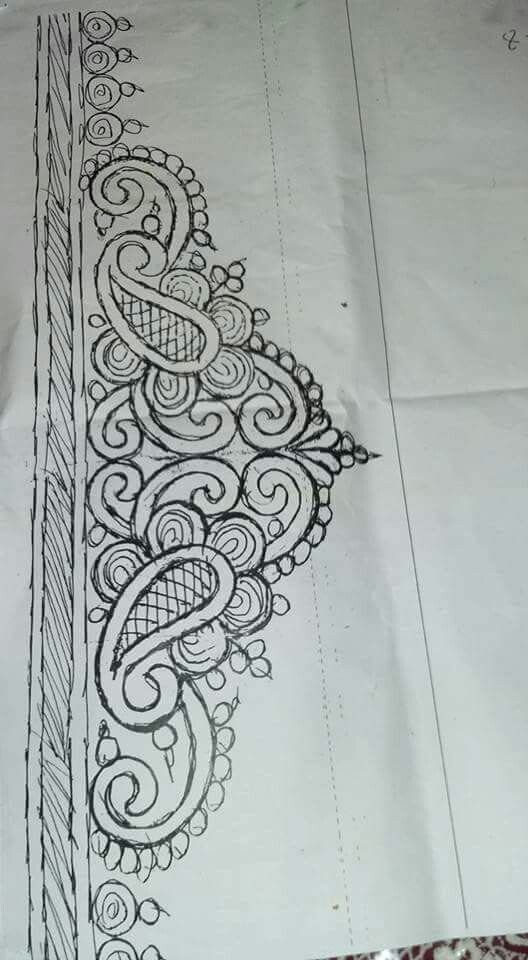
The above design can be used on the elbow length sleeves. The 1 inch border can be worked around the neckline with U Neck or Pot Neck. This design looks very elegant when intricate work is done using zari or silk thread and less of beads.
Shop Embroidery Supplies HERE.

This design looks very simple and its very easy to finish as well. Different colors of silk thread can be used to work this design. It can be used as border on the short sleeves, and around the neckline as well. This look good even on Silk and tissue kurtis, cotton saree blouses, linen blouses and simple silk saree blouses as well.
Shop Embroidery Supplies HERE.
This design looks amazing on short and elbow length sleeves. Same design can be worked on the back part of the blouse in the waist line and not around the neckline just for a change. Using Zardosi and knot work like french knots, clove stitch, ring knots and bullion knots will make the work outstanding.
Shop Embroidery Supplies HERE.

Sometimes less is more, so is this design. Very interesting floral design. The same design can be used in the sleeve border and the neckline. Embossing or padded stitches can be used to give the depth along with satin filling stitches and tambour work. This same design can be used for aari work saree tassels as well on the pallu.
Shop Embroidery Supplies HERE.

This design is super cute because it is geometric, and I love geometric anytime over floral. Lot of Satin stitch along with colorful bugle beads also called as cutdhana can be used to finish this work. Full design can be used on a elbow length sleeve and we can use a portion from the same paper and create a very beautiful neckline.
Shop Embroidery Supplies HERE.

This design is extremely simple and can be used on the sleeve as border with scallop shape sleeve round. The same can be used in the neckline and for saree tassels as well so that it matches the blouse. This design can be worked using very simple chain stitch, french knots, and some basic filling stitches.
Shop Embroidery Supplies HERE.

This design will definitely turn out to be very gorgeous if mirrors of different sizes are used. Suits as a border on the sleeve as well as neckline, either round neck, U neck or pot neck. Using plastic mirrors is always better than using real mirrors, because real mirrors tend to break and fall of. Plastic mirrors don’t break but they melt when to iron the blouse, so be very careful while ironing. Plastic mirrors are available in gold, silver and copper color and also in different sizes. The small leaves in the design can be filled with sugar beads or french knots or clove stitch. Fix the mirror with fabric glue, let it dry and then using satin stitch work around the mirror to make the work look woooow !!
Shop Embroidery Supplies HERE.
Tracing Powder or Chalk Powder – BUY NOW