[ad_1]
Step 1
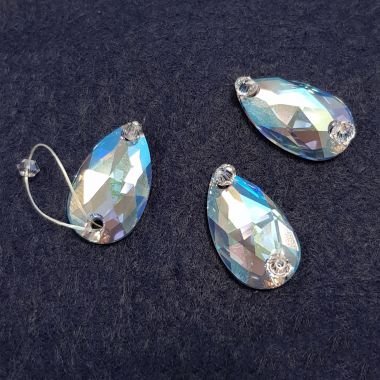
Take your 3 sew on droplet shape stones and place them on a square of felt measuring approx. 4 x 4 inches / 10 x 10cm.
Cut an armspan of thread and sew up through the felt and through a stone. Leave a 20cm length underneath for the tail thread.
Pick up a small purple bicone bead and thread back down through the same stone.
Thread up through the other hole on the same stone and repeat for all 3 droplets. Don’t worry about the thread on the underside of your design, this will be covered later on. Just make sure not to sew out of the bee shape, as you will trim around it later on.

Step 2
Once you’ve sewn on all 3 droplets, place this to one side for a moment.
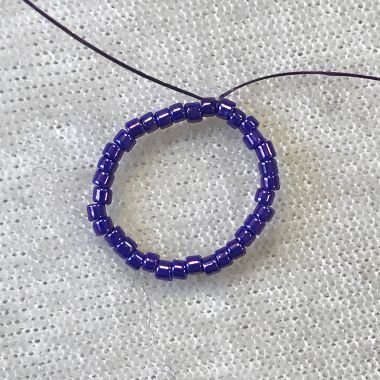
Take a new length of thread and pick up 8 x mauve bicones, then pick up 5 x pearls and 4 x bicones alternately. Thread through these beads again and knot the two ends together to make a loop that looks like this in the image.

Step 3
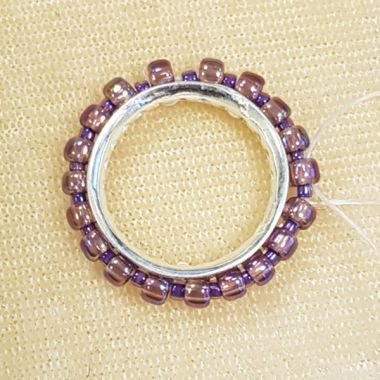
Cut a small circle of felt measuring slightly smaller than your square fancy stones width. Your circle of bicones made in the last step should fit around this disk. Cut a hole in the middle of this disk of felt. Glue this in place as shown in the image, at the top of the droplets. This will be where the fancy stone will sit. The hole in the disk will be where the point of the fancy stone will fit, and this will help hold it in place when you glue it in later.

Step 4
Take your circle of bicones and pearls and sew this to the base felt, around the circle of felt you just added.
Make sure your square fancy stone will cover this felt disk before sewing further. To do this, use the thread you used to sew the droplets on with. Make sure the pearls are around the bottom of the felt disk. Sew up through the felt in between beads on the circle, sew through 2 beads and back down through the felt. Sew back up so that you miss out the next 2 beads. Sew through 2 beads and back down through the felt. Repeat to attach the circle of beads around the disk.
(You will use this technique to add beads as you make your brooch – travelling back on yourself underneath the felt and adding 2 or 3 beads in stages.)

Step 5
Once you have done this, sew out of pearl on the right hand side of the circle. Pick up 2 x purple seed beads and thread down through the felt. Thread back up through the felt before the first seed bead you just added. Thread through the 2 seeds again. Pick up 2 x purple seed beads again and thread through the pearl. Travelling back on your beadwork helps to keep the beads sitting flush against each other, while also securing the line of beads to the felt underneath. Feel free to thread through the beads again if you feel it isn’t quite in place.

Step 6
Sew out from where the pearl meets the bicone below it. This should be where the point of the right hand droplet is.
Pick up 2 seed beads, sew down through the felt. Thread back up through the felt before the seeds you just added. Thread through the 2 again and add another 2. Repeat this until you have approximately. 36 – 40 seed beads around the edge of the droplet. Sew down through the felt on the other side of the droplet point.
(Use the same sewing technique as before – travelling back on yourself underneath the felt and adding 2 or 3 beads in stages.)

Step 7
Sew under the droplet at the base of the bee design. Sew a line of the same purple seed beads around this droplet in the same way as you did before.

Step 8
Repeat this again for the left hand droplet and add the group of 4 seed beads around the pearl on the left of the circle.
At this point, you can glue your fancy stone onto the felt. If you are using a glue gun, you can glue it now and it should dry quite quickly. If you are using specialised crystal/beading glue, you should do this at the end of the design (or wait a few hours before sewing again).

Step 9
Sew out of the top right side of the left hand droplet and pick up 2 x silver seed beads, 1 x 3mm pink bicone, 2 x silver seeds, 1 x 4mm bicone, 1 x 3mm bicone, 2 x silver seeds, 1 x purple seed. (Use the same sewing technique as before – travelling back on yourself underneath the felt and adding 2 or 3 beads in stages.)
Sew through the nearest seed bead around the droplet to join to two lines of beads together. Sew down through the felt.
Repeat the pattern on the other side of the bee around the right hand droplet.

Step 10
Sew under the felt and sew up at the top of the bee. Add 4 purple seed beads between the bicones on the top as shown in the image.

Step 11
Sew down through the felt again. Sew up through the felt slightly to the right, at the top centre of the gap in the middle of the bee. Add 1 x purple seed, 1 x pearl and 1 x purple seed. Sew down to the right. Repeat this and sew down to the left.

Step 12
Sew down through the felt and sew up before the 4mm bicone bead you added. Thread through the bicone and sew around the bottom droplet. Sew 3 x purple seeds, 1 x 3mm mauve bicone, 2 x seeds, 1 x bicone, 2 x seeds, 1 x pearl, 2 x seeds, 3 x pearls. Repeat the pattern in reverse so that both sides of the bottom droplet match.
(Use the same sewing technique as before – travelling back on yourself underneath the felt and adding 2 or 3 beads in stages.)

Step 13
Thread out through the centre pearl at the base of the bee. Pick up 5 seed beads and thread through the pearl again. Thread through the first 2 seed beads, miss the 3rd seed bead and thread through the 4th and 5th seed. Pull the thread so that the 3rd seed bead sits more prominently as shown in the image.

Step 14
Thread up through the top of the bee’s head and make 2 antenna curling outwards to the left and right. The pattern for these is – 2 x purple seeds, 1 x silver seed, 3 x purple seeds 1 x silver seed, 1 x 3mm bicone, 1 x silver seed, 1 x pearl, 1 x silver seed, 1 x 3mm bicone, 1 x purple seed.
(Use the same sewing technique as before – travelling back on yourself underneath the felt and adding 2 or 3 beads in stages.)

Step 15
Secure your sewing thread on the underside of the bee. Trim off the excess. Cut out the bee shape leaving approx. 2mm around the edge.

Step 16
Draw around this onto some paper and use this template to cut out a second bee shape that measures the same as your original.

Step 17
Sew these two together using a whip stitch (looping your thread over the edge over and over again.) Do this all the way around the edge of the bee, sewing the two pieces of felt together.

Step 18
Finally sew your brooch back onto the back of the felt. Secure your thread and hide this within your design (knot your thread and sew through the two layers of felt, out of one side and trim off this end. This leaves a tail of thread hidden inside the design after your knot.)

[ad_2]
Source link